Friday, August 31, 2012
Wednesday, August 29, 2012
Tuesday, August 28, 2012
Monday, August 27, 2012
Chocolate Truffle Torte
Cake:
1/2 c semisweet chocolate chips (or bittersweet, or shaved, etc.)
1/2 c butter
3/4 c sugar
1/2 c cocoa powder
3 eggs
1 tsp blackberry brandy (or orange liquor, or vanilla extract, etc.)
Preheat the oven to 300 F. Line an 8-inch springform pan with parchment (including the bottom – just trace the shape onto parchment and cut out). In a double boiler melt the butter and chocolate until smooth and combined. Let cool slightly.
Note: if you don’t have a double boiler (like me) you can use a heat-safe bowl over a bit of boiling water – I used a pyrex bowl that happened to fit right over a small saucepan I have with an inch or two of water, and it did the trick.
In a bowl combine sugar, cocoa, eggs, and brandy. Whisk to combine. Slowly add the melted chocolate and stir to combine. Pour into your lined springform pan and bake for roughly 30 minutes, or until a toothpick comes out clean. Let cool.
Ganache:
2 c heavy whipping cream
2 c semisweet chocolate chips or chocolate
1-2 tsp flavoring, optional
Again with the double boiler: heat cream until hot (not boiling), and throw in the chocolate chips. Turn the heat off and stir slowly to melt the chocolate. I should have taken pics of the color change as I stirred, but I will next time. Carefully pour the ganache over the cooled cake and let chill until the ganache is firm (like the inside of a chocolate truffle). I chilled mine for about 2 hours and it hadn’t firmed up, but was delicious nonetheless. Pop open the pan, gently peel the parchment off of the sides, slice, and serve with or without ice cream!
Frozen Strawberry Yogurt
Ingredients:
400g Strawberries
300g Sweetened Condensed Milk
500g Greek Yogurt
Method:
- Roughly chop half the strawberries and whizz the rest in a food processor or with a stick blender to a purée.
- In a big bowl, stir the condensed milk into the puréed strawberries then gently stir in the yogurt until well mixed. Fold through the chopped strawberries.
- Scrape the mixture into a loaf tin or container, pop on the lid or wrap well in cling film and freeze overnight, until solid. Remove from the freezer about 10-15 mins before you want to serve the frozen yogurt. Can be frozen for up to 1 month.
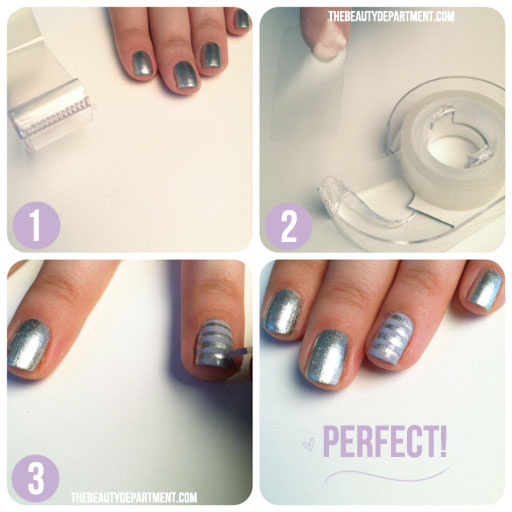
Nail Polish Tricks
- 1. Before you paint your nails is use nail polish remover, even if you don't have any nail polish on. Nail polish remover not only removes nail polish, but it helps with removing any debris on the surface of the nail that we may not see.
- 2. Put a base coat on! The base coat makes your polish easier to remove and makes it so that the colored lacquer doesn't stain the nail.
- 3. Apply a Top Coat, not extremely important, but I like to do this because it gives the nail polish a glossy look and also seals it, which keeps it from chipping.
- 4. When shopping for base and top coats, don't buy ones that are a base and top coat all in one bottle. The base coat and the top coat are designed to do very different things, the shiny look from the top coat makes the nail slippery, if you're putting that on first, then it makes applying nail polish hard, because it doesn't adhere as well.
Sunday, August 26, 2012
Back To School: Makeup Dos & Don'ts
Do: Look fresh and awake while staying true to yourself and your style.
1. Keep it light, soft & subtle – Keeping your makeup natural and effortless will help to avoid looking overdone, and also speeds up your morning routine. We all need our beauty rest, so keep it simple!
2. Brighten up tired eyes & dark circles – Peach and neutral shades on your eyes can camouflage an all-nighter study session, or you can always try the potato trick to reduce bagginess. Even a little concealer will help brighten up dark circles no matter how much/little sleep you get.
3. Consider time – Long-lasting foundation is good for school because you’re going to be spending a lot of time in class and don’t want to have to keep touching up. Setting your foundation with a powder will help keep your foundation matte, too.
4. Consider summer – You probably just spent a bunch of time in the sun, so when it comes to shade/tone for foundation, think about how your color may have changed. Your skin might be a couple shades darker so accommodate with your foundation. You want to avoid that ghost face faux pas, so click here for more tips on this one.
5. Redefine your window frames – Fill in your natural brows with a pencil that is two shades lighter for darker hair or two shades darker for lighter hair.
6. Lip stain markers – Stains are good for a natural look and last longer than normal lipstick. You can also never go wrong with your favorite shiny lip gloss, just be sure to keep it in your bag for touch ups!
Don’t: Overdo it and try to look older than you actually are.
1. Wear loud colors – Really bright eye shadow combinations can be distracting and a little over-the-top for a day at school. If you want to add a pop of color, try it in smaller proportions like blue eyeliner on the lower lash line or a brighter lip stain.
2. Pile it on – Applying too much makeup everyday for school can be difficult to maintain and can actually become really expensive. If you want to change your look 1 or 2 days out of the week try something different with your eyeliner (click here for some options) or add a pop or color every once in a while.
3. Forget about skincare – Whatever your morning routine looks like, you shouldn’t forget this important step. Cleansing and moisturizing your face before you put your makeup on is important for healthy skin and a youthful glow.
I think it’s important to embrace your youthful beauty, but at the end of the day, it really depends on your style. Stick to whatever you feel comfortable and beautiful wearing, and don’t forget to be confident!
Source:michellephan.com
Saturday, August 25, 2012
Subscribe to:
Posts (Atom)

